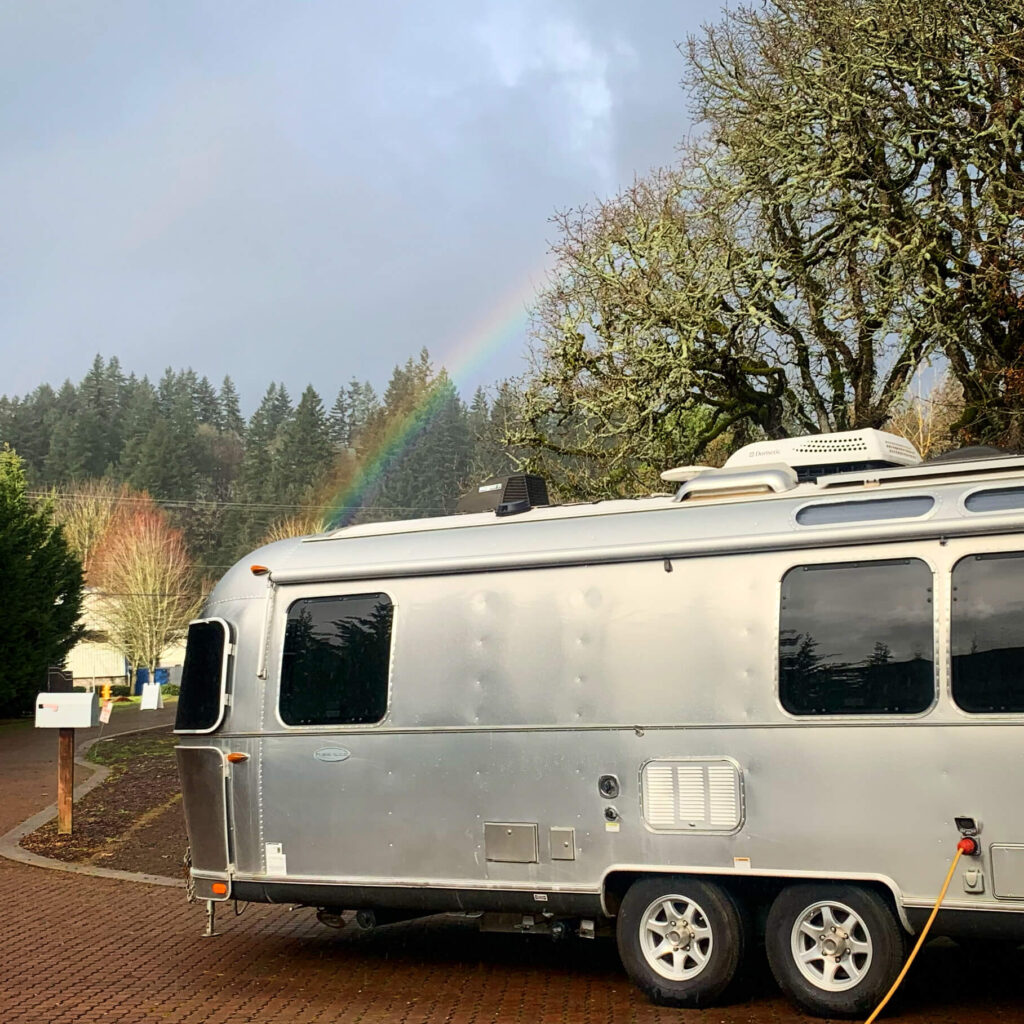
Solar kits for RVs have become essential for enabling off-grid living. With the increasing popularity of this type of living, more and more people are embracing the freedom and independence that comes with living off the grid. And when it comes to powering their RVs, solar energy is the go-to option.
The Benefits of Solar Energy for RVs
Using solar energy to power your RV has numerous benefits. Most importantly, solar kits provide a reliable and free source of power, allowing you to stay off-grid for longer periods without worrying about running out of energy.
The Growing Demand for Solar Kits for RVs
The demand for reliable solar kits for RVs has been growing steadily. As more people choose to live off-grid, the need for efficient and effective solar power solutions has increased. Companies like AM Solar have recognized this demand and have developed a wide range of solar panel kits specifically designed for RVs.
Embrace Off-Grid Living with Solar Kits for RVs
If you’re considering embracing off-grid living and want a reliable power source for your RV, solar kits are the way to go. With their numerous benefits and the increasing availability of high-quality options, it’s easier than ever to power your RV with the sun. Explore the options available and start your off-grid adventure today.
Solar Kits for RVs: The Ultimate Guide to Efficient Energy
Solar kits for RVs have become increasingly popular in recent years, providing a convenient and efficient way to power your RV with effective energy. But what exactly is a solar kit for RVs, and why should you consider using one?
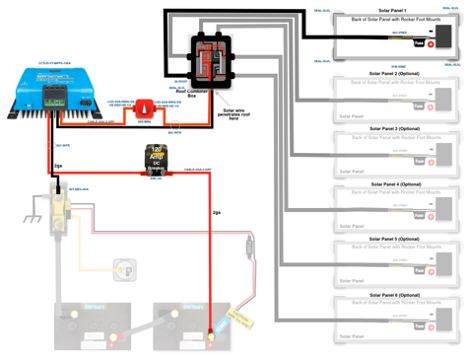
A solar kit for RVs is a complete package that includes all the components necessary to harness solar energy and power your RV’s electrical systems. These kits typically include solar panels, a charge controller, mounting hardware, rooftop combiner box, disconnect, output breaker, wiring, and lugs & heatshrink. By purchasing a complete solar kit, you can ensure that all the components are compatible and designed to work together seamlessly.
Convenience and Compatibility
One of the advantages of using a complete solar kit for your RV is the convenience it offers. Rather than trying to source individual components and figure out how to integrate them into your existing electrical system, a solar kit provides everything you need in one package. This not only saves you time and effort, but also ensures that the components are designed to work together optimally.
Another advantage of using a complete solar kit is the peace of mind it offers. Since all the components are specifically designed for RV use, you can be confident that they will withstand the rigors of travel and provide reliable power wherever you go. Additionally, many solar kits come with warranties, providing further assurance that your investment is protected.
Top 5 Complete Solar Kits for RVs
When it comes to choosing a complete solar kit for your RV, there are plenty of options to consider. To make your decision easier, we have created a list of the top 5 complete solar kits for RVs that we offer. Each kit offers unique features and benefits that cater to different needs and preferences. Here are our picks:
- Complete Solar Charger (30A) – Great for Travel Trailers and smaller Class Cs, these kits offer everything you may need to put up to 440W onto an existing battery bank.
- Complete Solar Charger (50A) – Great for Airstreams and Class Cs, these kits offer everything you may need to put up to 700W onto an existing battery bank.
- Complete Solar Charger (20A) – Great for Vans and Tear-Drop trailers, these kits offer everything you may need to put up to 290W onto an existing battery bank.
- Complete Solar Charger (15A) – Great for Truck Campers and battery maintenance, these kits offer everything you may need to put up to 230W onto an existing battery bank.
- Complete Solar Charger (100A) – Great for 5th Wheels and Class A motorhomes, these kits offer everything you may need to put up to 1600W onto an existing battery bank.
Factors to Consider When Choosing a Solar Kit for Your RV
When it comes to choosing a solar kit for your RV, there are several important factors to consider. These factors will ensure that you select a kit that meets your power requirements, fits within your budget, and integrates seamlessly with your existing electrical system. Let’s take a closer look at some of these key factors.
Power Requirements and Energy Consumption
First and foremost, you need to assess the power requirements and energy consumption of your RV. This will help you determine how many solar panels you will need and what size they should be. Consider the appliances and devices you use regularly while camping, such as lights, fans, refrigerators, and more. By understanding your power needs, you can choose a solar kit that provides sufficient energy to keep everything running smoothly.
Solar Arrays will produce a varying amount of energy depending on the time of year and where the system is. As a general rule of thumb, in Springfield Oregon, 100W of solar will net about 300Wh of energy in an average solar day. Using a calculator, like PVwatts, is a good way to refine this rule of thumb to your individual use case.
As an example, a 3.8 Cu ft 12V DC fridge may need about 6A or so to run the compressor, which is about 75W or so. If we assume the compressor is on half the time (0.5 duty cycle) then our total Wh demand in a day is 450Wh (75W * 24 hr * 0.5). This means we would want at least 150W of solar (450Wh / 300Wh) to offset this 3.8 cu ft DC fridge, using the general rule of thumb. If we wanted to explore using this system in the winter, it may be better to do a thorough analysis with a tool like PVWatts.
Available Roof Space
Another factor to consider is the available roof space for solar panel installation. RVs come in different shapes and sizes, so it’s important to measure the roof area where the panels will be mounted. This will help you determine the maximum size and number of panels that can be installed. Additionally, consider the orientation of your RV when parked. Aim to position the panels where shading from vents or A/C units is minimized.
Battery Capacity and Storage Requirements
Battery capacity and storage requirements are also crucial considerations. Solar panels convert sunlight into electricity, which is stored in batteries for later use. Assess your battery capacity and determine whether you need to upgrade to a larger battery bank to accommodate the additional energy generated by the solar panels. Additionally, consider the type of battery you have or plan to use, as different solar kits may be compatible with specific battery chemistries. As a general rule of thumb, 100W of solar panels in Springfield, Oregon will bank 25Ah in an average solar day.
Budget and Cost Considerations
Of course, budget and cost considerations play a significant role in the decision-making process. Solar kits vary in price depending on their size, quality, and additional features. Determine your budget and look for kits that offer the best value for your money. Keep in mind that investing in a high-quality solar kit may result in long-term savings on fuel costs and campground fees.
Compatibility with Existing RV Electrical Systems
Last but not least, consider the compatibility of the solar kit with your existing RV electrical systems. Check if the kit includes all the necessary components. AM Solar sells kits for all applications including, complete kits with panels, cores for existing pre-wire, and empty shells with no pre-wire.
By carefully evaluating these factors, you can select a solar kit that is tailored to your specific RV needs. Remember to consider your power requirements, available roof space, battery capacity, budget, and compatibility with your existing electrical systems. Doing so will ensure that you make an informed decision and enjoy the benefits of solar power while on the road.
Installing Solar Kits on RVs: A Step-by-Step Guide
Installing solar kits on RVs can provide a reliable source of electricity while on the road. Whether you’re a seasoned RV enthusiast or new to solar power, here are some guidelines to help you with the installation process.
- Determine your energy needs: Start by calculating the total wattage and hours of operation of the appliances and devices you’ll be using in your RV. This will help you determine the total Watt-Hour need of your use case, and subsequently, the size and number of solar panels you’ll need.
- Choose the right solar kit: Consider your available roof space and power requirements when selecting a solar kit for your RV. Remember, as a general rule of thumb 100W will net 300Wh a day. AM Solar offers a variety of solar panel kits for RVs, such as the kits listed above. Choose a kit that suits your needs.
- Mount the solar panels: Clean the roof surface where the mounts will be installed with 91% isopropyl alcohol. Set the panel with mounts on the roof and position it while the mounts are semi-loose. This will let everything settle into a natural tension-free position. Go around and tighten each Bolt gradually, being careful to keep the L-Foot in the same position. Lift the panel and peel the tape cover off of each mounting foot. Place the sticky panel back on the roof in the same exact position. Check that each foot is flat against the roof, and loosen knobs to make adjustments if necessary. Apply the sealant by completely burying the mount foot. We also have a video here, that details installing mounts onto panels without predrilled holes. And a video here, detailing the above rooftop instructions.
- Determine your interior wire route and install the combiner box (if not using a prewire): Choosing where you want your interior wire run to go is a mixture of aesthetic preference and electrical efficiency. Ideally, distance is minimized which means the shortest run from the roof to the battery bank. In practice, in or shop, we are usually wiring through void spaces between panels, or in closets where the loomed wire will not be an eye sore. Once you have determined your route, you will want to drill from the inside out to the roof. This will allow you to control the layers of the roof you drill through and minimize the amount of unnecessary holes in the roof. Once the spot looks good from below and above, use a hole saw for the wire gauge being used in the kit to expand that hole.
You will then pull the wire up though the roof, leaving a small length poking up out of the roof. You are now ready to install the combiner box. Peel the tape off the back of the box, and using the sealant provided mount the box to the roof making sure the wire you pulled through is going through the main roof side exit of the box. Caulk the outside edge of the box to keep water away from the tape. Strip back the wire and connect it to the buss bars inside the combiner box, red on red and black on black. We have a video here, detailing the process. - Connect the charge controller to the battery bank: Install the on/off switch either near the MPPT, which will be installed close to the battery bank, or close to where the wire enters the rig on the inside. Run the remaining wire to the battery bank/MPPT area, make your connections, and install the output breaker.
- Configure the MPPT and commission the system: Using our programming guides for your given battery, program the controller for optimal settings to ensure efficient charging of the battery bank. Turn everything on, and open your VictronConnect app to see how the system is performing to spec.
Maintaining and Maximizing Performance:
- Clean your solar panels occasionally: Use soft water and a terry cloth to keep the panels clean. Avoid abrasive materials or harsh chemicals that may remove the anti-reflective coating or damage the seal of the solar panel.
- Check wiring connections: Regularly inspect the wiring connections to ensure they are secure and free of corrosion. Loose or corroded connections can decrease the efficiency of your solar kit.
- Monitor performance: Use a battery monitor or VictronConnect App to track the performance of your solar panels. This will help you identify any issues or inefficiencies in your system.
- Troubleshooting: If you encounter any problems with your solar kit, refer to the resources provided on our website. We offer articles and guides on RV solar systems, including installation and troubleshooting.
Complete Solar Kits: The Essential Investment for RV Owners
By following these installation and maintenance tips, you can ensure that your solar kit performs optimally and provides a reliable source of power for your RV adventures. Remember to consult the manufacturer’s instructions and seek professional assistance if needed.
Our complete solar kits are custom designed for mobile applications and offer high-quality performance. If you’re ready to take your RV off-grid, we encourage you to explore our full range of complete solar kits and other products.
With our excellent customer support and technical advice, you can trust that we will help you choose the right components for your RV solar system. Don’t miss out on the opportunity to experience the freedom and sustainability of off-grid living. Start your solar journey with us today!